|


Mushroom Birthday Cake
- Home Page
- Birthday Cakes
- Mushroom Birthday Cake
THIS POST MAY CONTAIN AFFILIATE LINKS, WHICH MEANS I’LL RECEIVE A COMMISSION IF YOU PURCHASE THROUGH MY LINKS, AT NO EXTRA COST TO YOU. PLEASE READ PRIVACY POLICY AND DISCLOSURE FOR MORE INFORMATION.
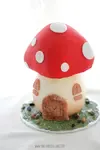
In this Mushroom Birthday Cake tutorial, learn how to create a whimsical, mushroom-shaped cake that's perfect for enchanting any celebration.

I made this mushroom cake for my niece’s birthday. When she first asked me to make her a mushroom cake, my first thought was , “that was random request”. But after doing some research online, I realized that it was it was actually a thing. Mushroom IS trending nowadays.
Mom (a.k.a. my sister) sent me some inspiration photos, and the backdrop for that she bought for photos and ooohh it was actually pretty cute. A little door and windows, the mushroom would seem like a perfect little house for a fairy!
Since the mushroom cake would have a red "roof," I thought red velvet would be the perfect flavor to match. I made one and a half batches of my Red Velvet Cake recipe, divided and baked it in three 6-inch round pans, along with one half-sphere pan for the mushroom cap.
Mushroom birthday cake Video
Watch how I made the mushroom cake in action.
Mushroom birthday Cake TUtorial
YOU WILL NEED:
Three 6" cakes and one half a 6" sphere cake
Buttercream
Serrated knife
Cake turntable
10" Cake board
Small offset spatula
Acetate
Red fondant
White fondant
Brown Fondant
Boba straws or dowels
Barbecue stick
Craft knife
Fluffy brush
Tan and brown edible food powders
Mallet or hammer
Rolling pin
Door and window fondant molds
Cornstarch
Chocolate rocks
Making the base of the Mushroom Cake
For the base of the mushroom, I used two of the 6-inch round cakes, cutting them in half horizontally and layering them with cream cheese frosting. After crumb-coating the entire cake, I placed it in the fridge for about 30 minutes to set, making it easier to carve into shape later.
Once the cake was chilled and firm, I began carving it with a serrated knife.
Here’s a tip for carving: take your time and cut carefully. It’s always better to shave off small pieces rather than large chunks—you can always remove more, but you can’t put the cake back once it’s gone!
Another important tip: Save all the cake scraps from leveling the domes and carving. You'll need them later to help shape the top of the mushroom. Sorry—no snacking just yet!
Click on the pictures to view the larger version of it.
 Start with cutting the bottom part of the cake. |
 Carve the top part of the cake. Cut a little bit more on the top so that it would look like more tapered. |
 Crumbcoat the cake with a thin layer of buttercream, this will seal the crumbs in. Chill the cake in the fridge for 5 minutes. |
 Add the final coat of buttercream. Add a bit more buttercream around the middle so it would look more bowed or bulgy. |
 Use a small spatula to smooth out the frosting as much as possible. |
 Then use a flexible plastic like acetate to smooth out the cake further. This is very satisfying btw. It's like magic. |
 Smooth our the top as well. Keep the base of the mushroom cake in the fridge while doing the next step. |
Making the mushroom "cap"
For the mushroom cap, I used half of a 6-inch sphere pan placed on top of a 6-inch round cake, with cream cheese frosting between the layers. There's a cake board slightly smaller than the cake on the bottom. After assembling, I applied a thin crumb coat of frosting and let it chill in the fridge for about 15 minutes to set.
I prefer the mushroom cap to have a more organic shape, so I used the cake scraps mixed with a bit of buttercream (like a cake pop mixture) to build it up. This step is totally optional, but I love how it gives the cake a more whimsical appearance.
 Add the final coat of buttercream all over the cake. |
 Use acetate to smooth it out. Then chill the cake in the fridge until firm. |
 Take the cake scraps that was set aside and add a bit of buttercream (just enough to hold it together and keep its shape). |
 Mush it until it comes together. |
 To shape the mushroom cap, press the cake mixture onto the sides, using more at the bottom and gradually thinning it out as you move upward. Even though it wasn’t planned, I ended up creating four "corners" on the cap. |
 Cover the rest of the exposed areas with buttercream. |
 Then smooth it out with acetate. Chill the cake after this. |
I could have finished the top of the mushroom with red buttercream but I had some red fondant on hand so I decided to use that instead. And to be honest, I didn't feel like making red buttercream, so fondant it is.
Make sure the cake is nicely chilled and firm before adding the fondant. Roll out the fondant to about 1/4" thickness or less. Dust the surface with cornstarch so that the fondant will not stick.
 Carefully place the rolled fondant on to the cake. |
 Gently smooth out the fondant using the hands. |
 Cut the excess with a knife. |
 Use the hands to buff and smooth the cake. Place the cake in the fridge after this step. |
Assembling
the Mushroom Birthday Cake
Next step, take out the other cake, the mushroom base, from the fridge. Again make sure that it is firm to the touch.
 Using a fluffy brush, add some brown colored edible powder. Add lighter brown on the top and darker brown on the bottom. |
 Brush the edible powder on the top as well. |
 To support the mushroom cap, I used three boba straws as dowels. First, I measured the height needed by inserting one straw into the cake and cutting it to match the cake's height. Then, I used this as a guide for the other straws. |
 Inserted the straws in a triangular shape in the cake. |
 Add more buttercream on the top, this will act as the glue. |
 Carefully place the mushroom cap and make sure that it is nicely centered with the base. |
 To keep the cake together, use a barbecue stick or a sharpened dowel the same height as the cake. |
 Use a hammer or mallet to drive the stick or dowel thru all the cakes. |
Making the doors and windows for the mushroom birthday cake
For the doors and windows, I lightly mixed different shades of brown fondant to imitate wood.
 Roll out the brown fondant. |
 Dust the door mold with some cornstarch so the fondant will not stick. |
 Roll the pin over the fondant on top of the mold. |
 Flip it over and gently pry out the fondant. |
 Cut out the excess with an craft knife. |
 Do the same to make the windows. |
Finishing the Mushroom birthday cake
Now we come to the best part - finishing the cake!
 Add in the door and windows. |
 Cover the cake board with some green buttercream. |
 Add in some chocolate rocks. |
 Finally, cut out different sizes of circles in white fondant and use some water to attach it on the top of the mushroom cake. |
My original plan was to add some buttercream flowers but alas, I ran out of time. But I think it still turned out cute, no?

Mushroom birthday Party
Now it's time to partay! Here is the cake with other goodies in the dessert table fit for the faeries.

Here she is up close with a mushroom "kebab" made out of marshmallow with strawberry on top.

I hope you enjoyed this tutorial!
xoxo,

The images, tutorials and content on make-fabulous-cakes.com are protected by copyright laws. DO NOT distribute or copy the content without written permission. DO NOT edit, crop, or remove watermarks from any image or video. If you intend to use any of the text, templates or images within, it must be linked back to this site with credit given to www.make-fabulous-cakes.com. For questions contact us HERE.
Disclosure: Please note some of the links in this post may be affiliate links, I will earn a commission if you decide to make a purchase. This doesn’t cost you anything additional and I truly appreciate this support, thank you!

Hi, I'm Darlene. I'm the creator, photographer, baker, recipe tester of Make Fabulous Cakes. Welcome to my sweet world!
MORE ABOUT ME >>
most popular posts
 |
 |
 |
 |
 |
 |
Recent Articles
-
Fabulous cake decorating ideas, Recipes and Cake Pictures.
Cake decorating ideas with lots of cake tutorials, cake recipes and inspiration for beginners and the more experienced cake decorator. -
Mushroom Birthday Cake
 In this Mushroom Birthday Cake tutorial, learn how to create a whimsical, mushroom-shaped cake that's perfect for enchanting any celebration.
 -
Swan Cake Tutorial
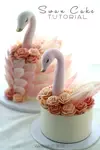 In this swan cake tutorial, you'll learn how to make a fondant swan head with buttercream roses and chocolate for feathers
online Classes

Featured in:
 |
 |
 |


